-
Brief
-
Quick Start
-
Fingerprint Introduction
-
Basic
-
Preference
- Workbench
- Abort image
- Abort video autoplay/Payload
- Mute audio
- Disable translate pop-up
- Disable autofill pop-up
- Disable website notifications
- Disable website clipboard access
- Stop opening while net error
- Stop opening when IP changes
- Cease access for changed IP location
- Sync tabs/ cookies/ IndexedDB/ local Storage
- Sync bookmarks/ saved autofill/ history/ extension Data
- Clear cache dir before launch
- Clear cache before startup (Retain extension data)
- Clear cookies before launch
- Clear history before launch
- Random fingerprint before launch
- Allowed signin to Chrome
- Continue to run the application after turning off the browser
- Disable GPU
-
Fingerprint
- Random fingerprint
- Kernel version
- Device
- OS
- OS version
- Browser version
- UA/User Agent
- Language/ Display language
- Time zone
- WebRTC
- Ignore HTTPS certificate errors
- Geolocation
- Window size
- Resolution
- DevicePixelRatio
- Fonts
- Canvas
- WebGL Image
- WebGL Metadata
- WebGL Vendor/ Renderer
- AudioContext
- Speech Voices
- Do Not Track
- ClientRects
- Device name/ MAC address
- Port scanning protection/Port scanning white list
- SSL fingerprint
- Custom plugins
- Hardware concurrency
- Device memory
-
-
Browsers
- Create browser
- Batch import browsers
- Batch create browsers
- Batch update browsers
- Batch update / import browser cookies
- Batch open selected browser
- Clone selected browser
- Set selected browser as favorite
- Batch export browsers
- Batch export cookie
- Batch edit browser
- Batch close browser
- Batch reopen browser
- Share browser to users
- Transfer browser to users
- Password verification for sharing/transferring browser
- Clear browser cache
- Delete selected browser
- Delete selected browser to recycle bin
- Permanently delete selecte browser
- Password verification for permanently deleting browser
- Advanced search
- View mine/favorite/opened browser
- View shared/transferred browser
- View browser by group
- Share management
- Customize columns
-
Recycle Bin
-
Groups
-
Proxy IP
-
Extension Center
-
Users
-
Account Securiy
-
FAQs
-
Getting Started
- What are the main features of the software?
- Does it support a trial?
- Can multiple users use it simultaneously?
- Which platforms does SupLogin support?
- How to ensure multi-account isolation?
- How many browsers can be opened on one computer?
- Does the SupLogin provide proxy IP?
- How to choose the proxy IP format?
- Does it support downloading and installing apps?
- Can SupLogin be used on a mobile phone?
- How to check the current subscription and expiration date?
-
Issues
- Batch import browser failure
- Failed to import cookies?
- Why does the browser crash and fail to open?
- Browser webpage not opening or is stuck?
- Proxy failure when opening the browser?
- What if there is an IP detection mismatch?
- How to change/ add users?
- How to detect the local network?
- How to change group?
- How to set multiple default homepages?
- Will the browser be deleted if the subscription expires?
-
Master Tutorial
- How to custom fonts?
- How to change UserAgent (UA) version?
- How to batch edit browser configurations?
- How to batch edit the browser kernel version?
- How to use auto paste delay?
- How to edit browser remark?
- How to batch edit browser group?
- How to import bookmarks to browser?
- How to set latitude and longitude/change geolocation?
- Does it support webpage translation?
- How to add plugins/extensions to the browser?
- How to abort image in the browser?
- How to abort video autoplay/payload in the browser?
- How to mute audio in the browser?
- How to set browser window to start maximized?
- How to quickly restore all tabs from the previous session?
- How to set headless mode?
- How to set up a proxy IP blacklist to save proxy traffic?
- How to autofill username and password for each browser?
- Is the browser data stored locally or in the cloud?
- How to sync cache and cookie data to another computer?
- Data not synced when transferring the browser?
- How to change the browser cache directory?
- How to clear browser cache?
- How to enable automatic login when the client opens?
- How to distinguish different browsers in the taskbar?
- How to quickly restore a minimized browser?
- How to change user's permissions?
- How to add SupLogin to Windows Security Center?
-
-
RPA Guide
- What is RPA?
- How to design a workflow task?
- What are the types of RPA tasks?
- How to create an RPA task?
- How to set task concurrency?
- How to enable/disable RPA tasks?
- How to update the RPA task?
- How to modify the bound browser?
- How to stop the RPA task?
- How to delete the RPA task?
- How to view the logs of RPA task?
- RPA tips
-
Settings
-
Logs
-
Billing
-
-
How to add plugins/extensions to the browser?
Method 1: Add directly in the Browser
1. Open the browser and visit the Chrome Web Store.
2. Search for the plugin or extension you need (e.g., Helium 10).
3. Click on Helium 10 -> Click "Add to Chrome" -> Click "Add Extension".
4. Once the plugin is installed, its icon will appear in the top-right toolbar of the browser. You can also click the extensions icon " " to choose whether to pin it to the toolbar.


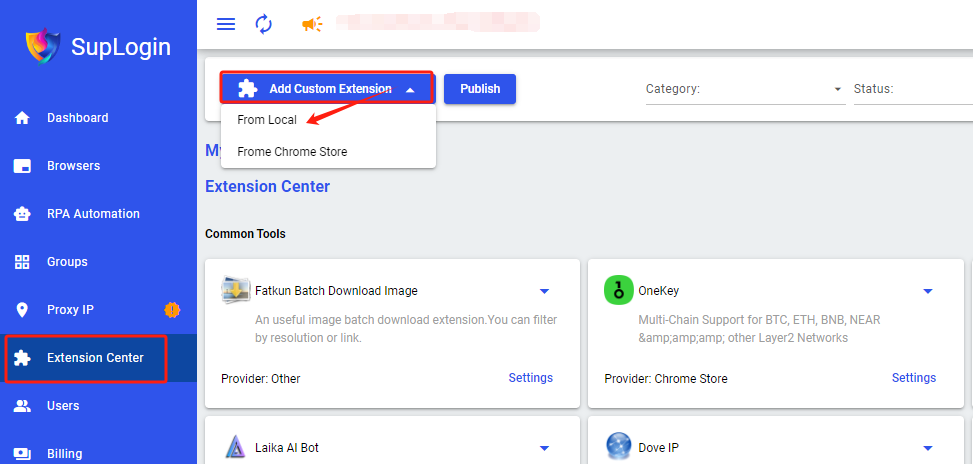
Method 2: Add via the Extension Center
1. Add Chrome Web Store Extensions/Plugins
(1) Open the Chrome Web Store in your local Chrome browser, locate the extension you want, and copy the URL of the extension's details page. (Take Grammarly for example)
(2) Go to the [Extension Center] -> Click Add Custom Extension -> Select From Chrome Store -> Paste the copied URL -> Click "Detect" -> Once recognized, click "Confirm" to add it successfully.
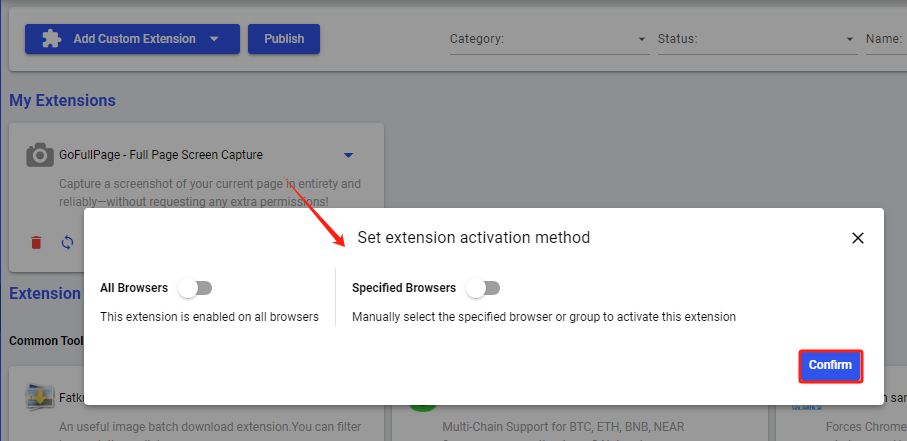
(3) After adding, you can find the extension under My Extensions. Click on Settings to configure the extension's usage range: enable it for all browsers or only for specific ones.


2. Add Local Extensions/Plugins
(1) Go to the [ExtensionCenter]-> Click Add Custom Extension -> Select From Local.
(2) In the pop-up dialog box, choose the folder path of the local extension.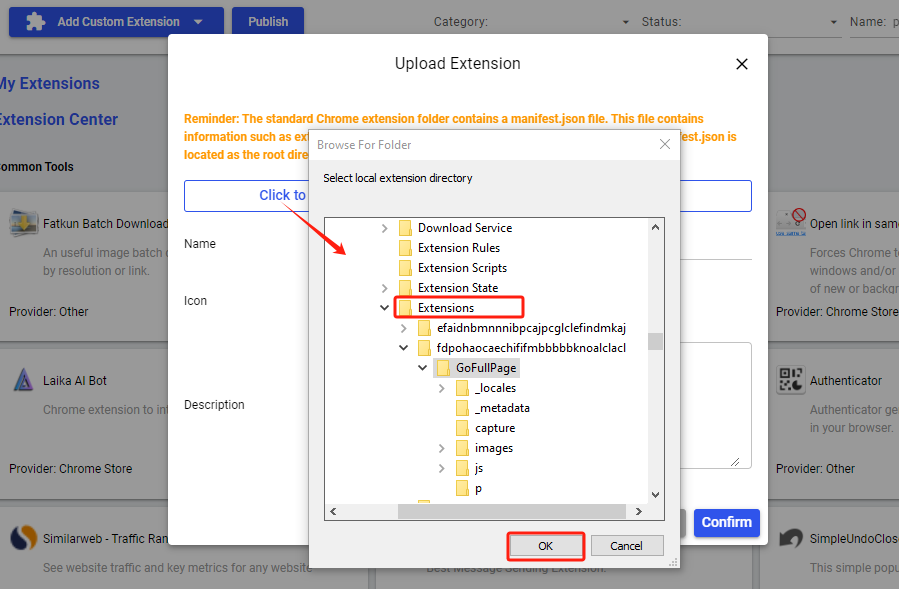
(3) The system will automatically recognize the extension content. Once recognized, click "Confirm" to successfully add the extension.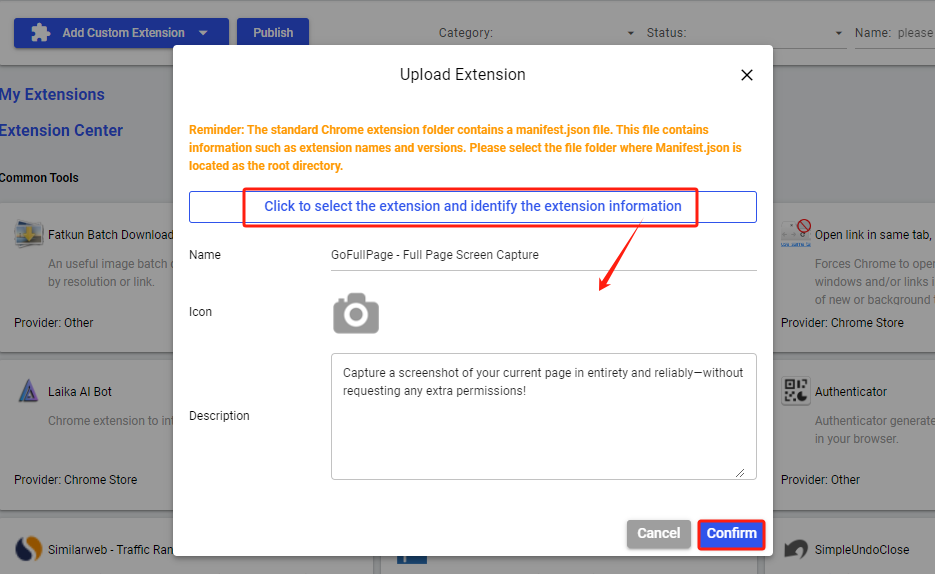
(4) After adding, you can find the extension under My Extensions. Click on Settings to configure its usage range: enable it for all browsers or only for specific ones.